Hey everyone, it’s Sam from your go-to dog recovery suit crew—wanted to dive into something that I get asked about all the time lately: how the heck do you actually put one of these suits on right? I’ve seen so many pet owners mess it up, like yanking it on too fast or skipping a step and then their dog is scratching at it nonstop, or even worse, it shifts and rubs a sore spot raw. This is actually my jam ‘cause I’ve been selling these suits for 6 years now, and I’ve helped so many nervous pup parents get it right, plus I’ve learned a ton from the vets I work with too. No fancy jargon here, just real, tested steps that actually work—no guesswork, I promise. Dog Recovery Suit
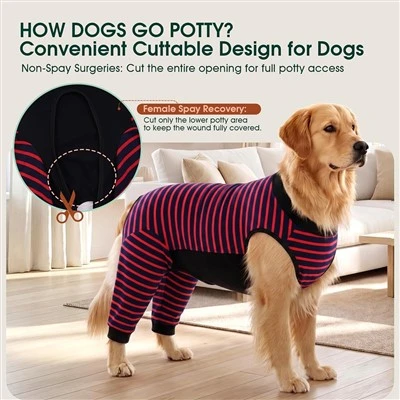
First off, let’s get one thing straight: your dog’s comfort is non-negotiable here. If your pupper is stressed, they’re gonna squirm, and you’ll probably both end up frustrated. That’s why I always tell folks to wait till your dog is in a calm, relaxed spot—maybe right after a walk, or when they’re curled up on the couch snacking on their favorite treat. If they’re already wound up from the vet visit, give ‘em 10 minutes to settle first. Also, grab a helper if you can—especially for bigger dogs or pups that hate having their stuff touched. A second pair of hands can hold their head, give treats, or pull the suit smooth without you fighting a wiggly fur baby. Pro tip: lay the suit out flat first, not bunched up in a pile. I see people do this all the time—they grab a crumpled suit and try to shove it over their dog’s head, and half the time the legs get twisted or the belly straps cross wrong. Smooth it out so all the seams are flat, and make sure the leg holes aren’t bunched up on one side.
Next, size matters more than anything. I can’t stress this enough—if you get the wrong size, even the best suit is useless. A lot of folks just guess, but here’s the easy way to measure: for chest size, run a soft tape measure around the widest part of your dog’s chest, right behind their front legs. For length, measure from the base of their neck (where their collar sits) to the base of their tail, not all the way to the tip—trust me, that’s a common mistake. If your pup is right between two sizes, size up, not down. Too tight and they’ll pant nonstop, rub their armpits raw, or can’t go potty comfortably. Too big, and it’ll slide up over their head or bunch around their legs. My team always reminds customers to check our size chart 3 times before ordering, and if you’re unsure, just shoot us a message—we’ve got a real person on the other end, not a bot, who’ll help you get it right.
Okay, let’s get into the actual putting-on steps. Start with the back of the suit, that’s the easiest part most people don’t know. Hold the suit open so the belly side is facing up, and the leg holes are toward you. Gently lift your dog’s hind legs one at a time, and slide each back leg through their matching leg hole. Don’t yank it—just guide it slow, and give a treat after each leg to keep ‘em happy. Once both back legs are in, stand at your dog’s hind end and pull the suit up towards their back. Make sure the seam down the middle of the suit is centered on their spine—this is key so it doesn’t twist when they walk. Now, if your suit has tail access (most of our ones do for potty breaks), slip their tail through the tail hole gently. If it doesn’t, just make sure there’s enough room around their rear end so they don’t have to step in pee or poo when they go.
Now the front legs—this is where a lot of people mess up, especially for small dogs or pups with narrow chests. Don’t flip the suit over yet! Keep it positioned at their back end. Reach under your dog’s chest, one side at a time, and gently pull their front leg through the matching front leg hole. Again, slow and steady, treats help here so they don’t get spooked. Once both front legs are in, this is where a helper is clutch—have them hold the top of the suit near their neck to keep it from sliding down, while you smooth out the whole thing. Make sure there’s no fabric stuck in their armpits or under their belly—pull all the edges smooth so there are no bunches.
Now the straps, the most important part for a secure, comfortable fit. Most of our suits have two belly straps (one near the front, one near the back) and a neck strap, sometimes with a little handle on top for lifting your dog if they need help going up stairs. Start with the belly straps—they should sit just below their ribcage, not tight enough that you can’t fit two fingers under them. If you can only fit one, it’s too tight; if you can fit three, it’s too loose. We use adjustable Velcro on all our suits, not snaps, ‘cause snaps can pop open when your dog scratches, and Velcro is easy to adjust and stays put. Tuck the loose ends of the Velcro so they don’t flop around or get chewed. Now the neck strap—this should sit loose enough that you can fit two fingers under it too, right behind their ears, not choking their neck. If it’s too tight, it’ll rub their throat and make them hate the suit. And if there’s a top handle, that’s just for you to grip—never yank your dog by it, that’ll hurt.
Wait, let’s talk about common mistakes I’ve seen that cause so many issues. First, not checking for fabric bunching around the neck or armpits. Even if you think it’s on right, when your dog stands up and walks, fabric will shift. Always give the suit a once-over after it’s all on—run your hands along their sides, under their legs, around their neck to make sure nothing is rubbing. Second, leaving the Velcro ends untucked. Loose Velcro can stick to their fur, get chewed, or even catch on something and rip the suit. Third, not adjusting the fit after your dog moves around. Sometimes they’ll hunch their back, or their chest will puff out, so the straps might loosen or tighten a little mid-walk. Quick tweak is all it takes. Fourth, rushing. I’ve had customers call me panicking saying their dog is screaming, and when I ask what they did, they say they shoved the suit on in 30 seconds. Dogs can tell when you’re stressed, and they get stressed too—take it slow, give treats, make it a positive thing.
Also, here’s a vet-approved tip from the guys I work with—if your dog has a wound on their belly, don’t pull the suit over their head till after the legs are in? Wait no, wait, that’s an old trick, but actually, most of our suits are designed to stay open enough that you don’t have to pull them over their head. Wait, maybe I should clarify: some cheaper suits force you to pull them over the head, which is way more stressful for the dog, but all our recovery suits have full belly and back openings so you can slide them on like we talked about, no head pull. That’s a big difference. If you’re buying a suit that makes you pull it over their head, keep looking—those aren’t as good for your pup, trust me.
Another thing: how do you know when it’s too tight? Watch your dog. If they’re panting super heavy even when they’re not hot, that’s a sign. If they’re lying down weird, or avoiding moving, that’s another. If they’re scratching at the suit nonstop, check for rub marks—red spots on their armpits, neck, or belly? Loosen the straps. A good fit means your dog can walk, run, lie down, go potty, and even play a little if they want, without the suit shifting. We always test our suits on our office dogs—we’ve got a 50lb lab mix named Max, and a 10lb chihuahua named Lila, and we try every fit ourselves before sending them out. If it’s comfortable for us to wear (we joke around), then it’s good for your pup.
Wait, what about aftercare for the suit? No, wait, the question is putting it on, but a quick note—washing the suit regularly keeps it from getting smelly, and makes the Velcro stick better. But that’s a side thing. Let’s get back to making sure you don’t mess up putting it on. If your dog is a long-haired breed, like a golden retriever or a maltese, make sure when you slide the legs through, you don’t trap fur in the leg holes. Gently pull fur out as you smooth the suit. We also make a fur-friendly lining on all our suits, so that’s less of an issue, but it’s still worth checking. For short-haired dogs, same thing—no extra steps, just watch for bunching.
I know it might seem like a lot at first, but once you do it once or twice, it’s so easy. Last month, a customer brought in a 8-month-old golden retriever named Charlie who had surgery on his hind leg—he was fighting everyone for the first 2 days, the suit kept coming off, he had rub marks. We sat with him, measured Charlie right, walked him through each step slow, gave him peanut butter treats every time he let us touch a leg, and by the end, Charlie was letting us put the suit on in 2 minutes flat, and even curled up on the couch with it on that night. The customer texted me a pic the next day, Charlie was napping like a baby, no rub marks, no scratching. That’s why I do this—helping pups get comfortable and owners not stress about the recovery process.
At the end of the day, the biggest thing is being patient with both your dog and yourself. It’s okay if it takes a few tries to get the fit right, or if your pup hates it at first—most dogs take a day or two to get used to the suit. The key is getting the size right, taking it slow, checking the straps, and making sure there’s no rubbing. If you have questions about sizing, or how to adjust the fit for your specific dog, just reach out—we’re here to help. We’ve got all kinds of suits for different needs: spay/neuter, wound care, skin conditions, even post-surgery mobility help. If you’re looking to stock up for your clinic, or buy for your own pup, we can work out bulk orders, custom sizes, whatever you need. No pressure, no weird fine print, just good suits and good service.

So that’s it—no fancy tricks, no confusing steps, just real, tested ways to put on your dog’s recovery suit right. Remember: measure twice, go slow, give treats, and check for rub marks. If you mess up a step? Start over. Your pup will thank you, and you’ll both be way less frustrated. If you want more tips, or to chat about ordering, hit us up anytime. We’re here to make pup recovery way less stressful for everyone.
Dog Cooling Vest References:
- American Animal Hospital Association. (2022). Canine Post-Operative Care Guidelines.
- Veterinary Surgical Nursing Association. (2021). Best Practices for Fitting and Using Post-Operative Pet Clothing.
- Journal of Veterinary Behavior. (2020). Owner Compliance and Perceptions of Post-Operative Recovery Aids for Dogs.
Suzhou Polang E-Commerce Co., Ltd.
Suzhou Polang E-Commerce Co., Ltd. one of the most experienced dog recovery suit manufacturers and suppliers in China. With a professional production team, we offer a wide range of pet apparels with superior quality. Please feel free to buy the newest dog recovery suit in stock here from our factory. Welcome to contact us for free sample and discount information.
Address: Room 312, Area A, No.99 Xiqing Street, Xiangcheng District, Suzhou City, Jiangsu Province, P.R.China
E-mail: team@kuoser.com
WebSite: https://www.kuoser.net/
